Saturday, February 27, 2016

This year's group birthday cards!!

Every year I am in charge of making birthday cards for my group.  Each year I try to make the a little different, but the goal is to make it so all 24 people in my department can sign it.  Usually when someone gets a birthday card from the store, you get about an square inch to sign.  I make sure people have plenty of room to sign.  Here are some older posts that I shared some other group cards.

I've made these before, but this time I made them with 12X12 paper. Here's my post when I made them before.

I cut the 12X12 in half and scored it at 4-1/2" and at 5", then at 10-1/2"
Then you fold up at the 10-1/2" line and staple it down.
For the inside, I took an 8-1/2" X 11" scored it at 4-1/4" and at 8-1/2", then cut it in half lengthwise.

You will get 2 sheets, but you need 3 sheets, so repeat with another sheet of cardstock.

Fold them in a zig zag fashion.
Adhere 2 of them together using the shortest flap together.
For the third sheet you want to cut off 1-1/2" off and score the strip at 3/4" in the middle.
You use this to attach the third sheet to the other two.
Fold up the inside sheets and use the third sheet with the inch flap leftover and adhere it to the inside of the card.


Then fold over the cover at the 4-1/2" and 5" marks.  You can tuck in the inside and then tuck in the cover so that it starts to look like a matchbook
Here it is all done and labelled for the birthday recipient.
Here is the stack of all 24 of the cards, ready to deliver and ready for the whole year!
Thank you for checking in!


Sharon Lim
Stampin' Up! Independent Demonstrator #54149
Rubber Stamps and Accessories including Scrapbooking 

EMAILsharonitwithyou@gmail.com
CELL: (707)486-3500

Saturday, February 13, 2016

Had a great card class!!

I had a co-worker ask me to host a card class so here are the cards we made.  They got to make 2 cards of the 3 designs. 

 Here is the first design:  A flip card using the Cherry on Top Designer Series Paper (DSP) and Cherry on Top Cardstock Pack.  The sentiments are from the Tin of Cards stamp set.
 I love how the cards folds with the 2" circle punch as the part that brings it all together.
 The next card is a Valentine's Day card using the Heart Framelits and making an easel card.  I love the banner on top that I used a bone folder to curl it in opposite directions.
Here is the side view of the card when it stands up.

 The last card uses 2 items from the Sale-A-Bration catalog, where you can earn these items for every $50 you spend.  I used the Botanicals for You stamp set and the Perfectly Artistic DSP, and accented them with pearls or rhinestones and used the Wink of Stella pen to accent the words.

Thank you for checking in!
Sharon
Built for Free Using: My Stampin Blog


Sharon Lim
Stampin' Up! Independent Demonstrator #54149
Rubber Stamps and Accessories including Scrapbooking 

EMAILsharonitwithyou@gmail.com
CELL: (707)486-3500
Saturday, February 6, 2016

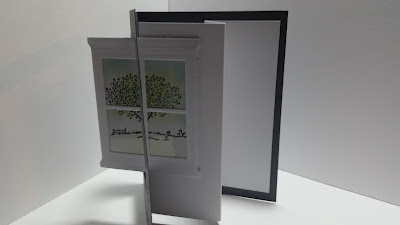
Pop Out Swing Card


Inspired by Nicole Tugrul's Spooky Pop Out Swing Shaker, I created this with the new Happy Home Bundle in the Occasions Catalog.  
Here are my versions of the Pop Out Swing card.
Here they are all opened up.
Start with a Basic Gray cardstock cut to 8-1/2" X 5-1/2" scored at 4/1/4"

Emboss the front of the card with the Brick Wall Textured Impressions Embossing Folder

Using the Hearth and Home Thinlits, cut out the window on the front of the card, and cut out 2 out of Whisper White (WW) cardstock.


Stamp a 3" X 2-1/2" Whisper White with one of the scenes included in the set using Basic Black ink .  There is a park bench, a child flying a kite and a tree.
Use sponge daubers to color the sky, grass and tree.  If you want more detailed color, use the Many Marvelous Markers to color the small details.
Flip over one of the WW windows.  Cut a piece of the Window Sheets to 3" X 2-1/2"and glue to the back of the window. 
Then, flip the window over, and glue it onto the scene, making sure it fits the window you created, then glue the second window, and "sandwich" your scene in between the two windows, let dry.
Meanwhile, using a 5" X 6" Whisper White, score every 2 inches and fold like a "Z"
Only adhere the back of the "Z" to the back of the Basic Gray.
Close the card and only place adhesive on the Whisper White that is showing from the opening on the front of the card.  
Then, line up the window you created and ensure it lines up with the space you created on the front of the card.
Here is the card opened:

If you would like to order any of these items, click on the links below and use the Hostess Code: TS7ZJDBQ 

Thank you for checking in!
Sharon
Built for Free Using: My Stampin Blog


Sharon Lim
Stampin' Up! Independent Demonstrator #54149
Rubber Stamps and Accessories including Scrapbooking 

EMAILsharonitwithyou@gmail.com
CELL: (707)486-3500