Hello,
When I first saw this card on Pinterest, I was intrigued.
How does it close? How is the connector attached? This is my version of this card, and I named it, Accordian Surprise card.
For this version, I used the Happy Hibiscus embossing folder, and created a "connector" similar to the one I used for the Kintsugi Inspirations Triple Arch cards I made before.

For this one, I used the Sunflower 3D embossing folder and a Daffodil Delight connector.

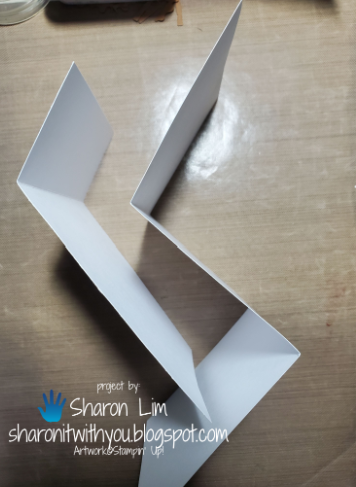
To make the connector, I cut out 2 shapes from the Nested Essentials and made a connector with a 1-1/2" X 2", scored at 1". Here is the back of the connector.

Here is the back of the connector. I made sure when the connector is folded in half, it matches perfectly.

Here are the pieces of the card you need to make this card yourself.

Below is the full video tutorial.
Please support me by:
- Registering for my monthly card events
- Signing up to get my blog posts
- Subscribing to my YouTube channel
- Shop with me for FABULOUS Stampin' Up! products
- Join my team and enjoy 20% off (or more) with no selling!
- Any questions? Email me at sharonitwithyou@gmail.com and I would be happy to help!
Thank you for checking in!
CLICK ON THE IMAGES BELOW TO ORDER SUPPLIES TO MAKE THIS CARD Product List
![Basic White 8 1/2" X 11" Cardstock [ 166780 ]](https://assets1.tamsnetwork.com/images/EC042017NF/166780s.jpg "Basic White 8 1/2\" X 11\" Cardstock [ 166780 ]")
![Nested Essentials Dies [ 161597 ]](https://assets1.tamsnetwork.com/images/EC042017NF/161597s.jpg "Nested Essentials Dies [ 161597 ]")
![Sunflower 3 D Embossing Folder [ 166145 ]](https://assets1.tamsnetwork.com/images/EC042017NF/166145s.jpg "Sunflower 3 D Embossing Folder [ 166145 ]")
![Daffodil Delight 8-1/2" X 11" Cardstock [ 119683 ]](https://assets1.tamsnetwork.com/images/EC042017NF/119683s.jpg "Daffodil Delight 8-1/2\" X 11\" Cardstock [ 119683 ]")
![Happy Hibiscus Hybrid Embossing Folder [ 164879 ]](https://assets1.tamsnetwork.com/images/EC042017NF/164879s.jpg "Happy Hibiscus Hybrid Embossing Folder [ 164879 ]")
Sharon
I am Sharon Lim and
I am an Independent Stampin' Up! Demonstrator
I sell Rubber Stamps and Accessories including Scrapbooking


![Botanical Textures 12" X 12" (30.5 X 30.5 Cm) Designer Series Paper [ 165545 ]](https://assets1.tamsnetwork.com/images/EC042017NF/165545s.jpg "Botanical Textures 12\" X 12\" (30.5 X 30.5 Cm) Designer Series Paper [ 165545 ]")
![Basic Black 8-1/2" X 11" Cardstock [ 121045 ]](https://assets1.tamsnetwork.com/images/EC042017NF/121045s.jpg "Basic Black 8-1/2\" X 11\" Cardstock [ 121045 ]")
![Paper Trimmer [ 152392 ]](https://assets1.tamsnetwork.com/images/EC042017NF/152392s.jpg "Paper Trimmer [ 152392 ]")
![Basic White 8 1/2" X 11" Cardstock [ 159276 ]](https://assets1.tamsnetwork.com/images/EC042017NF/159276s.jpg "Basic White 8 1/2\" X 11\" Cardstock [ 159276 ]")


![Kintsugi Inspirations 12" X 12" (30.5 X 30.5 Cm) Specialty Designer Series Paper [ 165159 ]](https://assets1.tamsnetwork.com/images/EC042017NF/165159s.jpg "Kintsugi Inspirations 12\" X 12\" (30.5 X 30.5 Cm) Specialty Designer Series Paper [ 165159 ]")
![Everyday Arches Dies [ 164629 ]](https://assets1.tamsnetwork.com/images/EC042017NF/164629s.jpg "Everyday Arches Dies [ 164629 ]")
![Misty Moonlight 8-1/2" X 11" Cardstock [ 153081 ]](https://assets1.tamsnetwork.com/images/EC042017NF/153081s.jpg "Misty Moonlight 8-1/2\" X 11\" Cardstock [ 153081 ]")
![Inspiring Imperfections Dies [ 165166 ]](https://assets1.tamsnetwork.com/images/EC042017NF/165166s.jpg "Inspiring Imperfections Dies [ 165166 ]")


![Beautiful Gallery 6" X 6" (15.2 X 15.2 Cm) Designer Series Paper [ 165196 ]](https://assets1.tamsnetwork.com/images/EC042017NF/165196s.jpg "Beautiful Gallery 6\" X 6\" (15.2 X 15.2 Cm) Designer Series Paper [ 165196 ]")
![Basic Beige 8 1/2" X 11" Cardstock [ 164511 ]](https://assets1.tamsnetwork.com/images/EC042017NF/164511s.jpg "Basic Beige 8 1/2\" X 11\" Cardstock [ 164511 ]")
![Mossy Meadow 8-1/2" X 11" Cardstock [ 133676 ]](https://assets1.tamsnetwork.com/images/EC042017NF/133676s.jpg "Mossy Meadow 8-1/2\" X 11\" Cardstock [ 133676 ]")


![Nature's Sweetness 12" X 12" (30.5 X 30.5 Cm) Specialty Designer Series Paper [ 162616 ]](https://assets1.tamsnetwork.com/images/EC042017NF/162616s.jpg "Nature's Sweetness 12\" X 12\" (30.5 X 30.5 Cm) Specialty Designer Series Paper [ 162616 ]")
![Birthday Celebration Bundle (English) [ 164599 ]](https://assets1.tamsnetwork.com/images/EC042017NF/164599s.jpg "Birthday Celebration Bundle (English) [ 164599 ]")
![Pecan Pie 8 1/2" X 11" Cardstock [ 161717 ]](https://assets1.tamsnetwork.com/images/EC042017NF/161717s.jpg "Pecan Pie 8 1/2\" X 11\" Cardstock [ 161717 ]")
![Pecan Pie Classic Stampin' Pad [ 161665 ]](https://assets1.tamsnetwork.com/images/EC042017NF/161665s.jpg "Pecan Pie Classic Stampin' Pad [ 161665 ]")
![1-3/4" (4.4 Cm) Circle Punch [ 119850 ]](https://assets1.tamsnetwork.com/images/EC042017NF/119850s.jpg "1-3/4\" (4.4 Cm) Circle Punch [ 119850 ]")