Showing posts with label Food. Show all posts

Sunday, May 22, 2022

Luv2Stamp Group Blog Hop-May 2022-Father's Day

Welcome to the Luv 2 Stamp Group's 2022 Blog Hop!  We are excited to share projects with you this year. We hope to inspire you to create beautiful new projects.  Each month we will have a different theme based on the next month's celebrations using Stampin' Up! products.
Once you are done with each post, scroll down to the bottom and you will see a list of Blog Hop participants, you can click on their name to go to their post, or you can click the next button to go to the next post in line.
Happy crafting!  This month's theme is Father's Day.
Here is my project, it's a Double Tower Bridge card inspired by Leena Gira, and yes, it fits in a regular A2 envelope. 

Start with an Early Espresso card base measuring 4-1/4 X 10-1/4" score at 1/2", 1-1/4", 2", 2-3/4" and repeat on the other side.
Glue down the first tab on both sides to form the two towers.  It should look like this:
For the strips on the towers cut coordinating cardstock. Here I had Early Espresso and Soft Succulent.  In the video tutorial, I used Cajun Craze and Early Espresso cardstock.
To make the bridge, you need a piece of DSP and two more coordinating cardstock, measurements on the picture below.
For the center of the card, use a piece of DSP measuring 3" X 4" and coordinating cardstock measuring 3-1/8" X 4-1/8".
For the back, cut a piece of Basic White measuring 4" X 4-1/4".
For more inspiration from the Luv 2 Stamp Group Blog Hop Team, click on the image below to visit the talented Laurie Bradshaw.  Don't forget to continue following links on each blog to see everyone's projects!
Click below to watch a video tutorial on how to make this card.
Luv2Stamp Group Blog Roll-May 2022

Please support me by:            

CHECK OUT MY LINKS for more ways to connect with me!!
Thank you for checking in!
Looking forward to sharing more with you next time.    
Sharon  


Sharon Lim

Stampin' Up! Independent Demonstrator 

Rubber Stamps and Accessories including Scrapbooking 
Tuesday, July 31, 2018

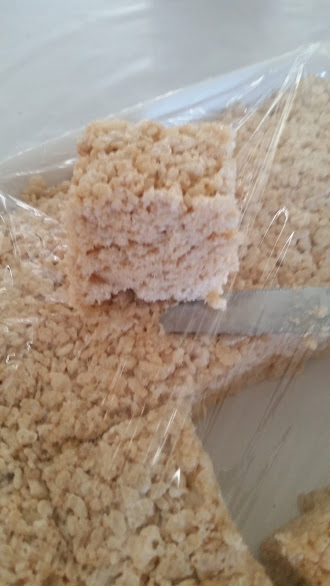
Why are my Rice Krispy Treats so THICK?

Hello,
Who has had some of my RICE KRISPY TREATS?

I had someone asked me why my Rice Krispy Treats are so thick? I didn't know how to answer.  
So this is how I make them.  I call it my dump recipe because I use a whole bag of marshmallows, a whole box of cereal and half a stick of butter.
Check out my old post here:  My Very Own Rice Krispy Treats Recipe.
Then, I realized, it's how I remember similar Chinese treats from my childhood.  
Check out this video I found on how THEY make them in China!! You think mine are THICK?!!!  And the ACTUAL popping of the rice!!! SO COOL!!
Thank you for checking in!
Looking forward to sharing more with you next time.

Sharon


Sharon Lim
Stampin' Up! Independent Demonstrator #54149
Rubber Stamps and Accessories including Scrapbooking 

EMAIL: sharonitwithyou@gmail.com
CELL: (707)486-3500
PayPal.Me/SharonLim

Sunday, July 17, 2016

Making my vegee tray!!

Hello,
I always make a vegee tray for any party/event I organize or attend.
The one thing I always get questions about is the jicama. 
"What it that?" 
"What does it taste like?" 
"How do you serve it?" 
I buy it so often at Raley's I even know the vegetable code (#4626) for it and have to tell the cashier if they don't know what it is and I tell them and then tell them to code to punch in.  
This is what jicama looks like when you buy it.
I first start with peeling it with a knife.  If you don't peel enough of it, it still has some fibrous parts that are hard to chew.
Once the peel has been removed, it looks like this:
I start by cutting it in half first.
Then, into planks, then into strips.
For the celery, I take off the out stems and wash them first.  Then, I cut off the white ends.
Next, I cut off the leafy tops.
You end up with many stalks.  If they are too wide, I cut them in half first.
Then, I cut them into bite sized sticks.
For bell peppers, I choose one of each color.  I was told that the ones with the 3 bumps are good for snacking and the ones with 4 bumps on the bottom are good for cooking.
First, I cut off the top.
Next, I cut off the bottom.
Then, I stand it on it's end and cut a slit down the side.
Then, I run the knife down the sides so you are cutting out the middle of the pepper.
You end up with the center in one piece and a strip of the pepper that you can cut into smaller snack sized strips.
Nothing goes to waste, I bring this bag to my sister and brother-in-law's ranch to feed the chickens and pigs.
Here is the finished vegee tray.
Thank you for checking in!
Sharon


Sharon Lim

Stampin' Up! Independent Demonstrator #54149
Rubber Stamps and Accessories including Scrapbooking 

EMAIL: sharonitwithyou@gmail.com
CELL: (707)486-3500
PayPal.Me/SharonLim

Saturday, June 4, 2016

Chicken Pot Pie recipe


This is one of my FAVORITE recipes that I make at least once a month.  Here are my other posts about FOOD.   I also have a Pinterest Board of other recipes I have tried and liked. I call it PINTEREST WINS!!! 

Chicken Pot Pie
Here's the recipe to make 1 pie, but I always double the recipe and make 2 pies, so I can freeze the leftovers and have pie for lunch/dinner later:

Pillsbury Pie Crusts (One package has 2 crusts) 
2 cans of Cream of Potato soup
milk or water
1/2 tsp ground thyme
1/4 pepper

1-1/2 cups potatoes, peeled and diced
1-1/2 cups carrots, diced
1 cup of frozen peas
leftover cooked chicken

1 egg, beaten well with 1 Tbsp of water (This is the egg wash)

In a large mixing bowl, pour the cans of soup and add 1/2 can of milk (or water) and mix well.  Add thyme and pepper.

Boil the carrots and potatoes until fork tender. Place frozen peas in a colander and then pour the carrots and potatoes over the peas when they are done.  Rinse with cold water to cool slightly.

Add the vegetables into the soup mix and mix well.

Prepare the crusts (let sit out from refrigerator for 20 minutes) and then place into pie pan. Pour filling into bottom crust and spread out.  Roll out top crust onto filling and tuck the top crust behind the bottom crust.  (Some people like to trim the crust, but I don't like waste the crust, so I use all of it, it's my FAVORITE part).  Crimp the edges.
Cut out vent holes.  Again, I don't waste, so I cut out 3 leaves and put them next to the holes.  Brush the egg wash onto the top crust. 
Bake for 45 minutes until golden brown.  Remove from oven to cool before serving.
ENJOY!!!
There was a time where I got distracted and baked my pies and then realized I forgot an ingredient.  Can you guess what I forgot?
Thank you for checking in!
Sharon


Sharon Lim
Stampin' Up! Independent Demonstrator #54149
Rubber Stamps and Accessories including Scrapbooking 

EMAIL: sharonitwithyou@gmail.com
CELL: (707)486-3500
PayPal.Me/SharonLim

Saturday, March 26, 2016

Peanut Butter and Banana sandwiches!! Who's a fan?

Okay, a non-crafty post today, let's talk FOOD.  Here are my previous posts about food and more recipes I've tried.  Here is my Pinterest board I named "Pinterest WINS!!" It is full of recipes that I have tried and loved and want to save and share with others.

Sometimes I want a simple snack.  I go back to Peanut Butter and Banana sandwiches. I never really had them until I went to college.  This combination was just never something we thought of growing up.  This is what my sandwiches look like.  You may wonder why there are 3 pieces of bananas on the bread (which is toasted of course).

Did you know that a banana naturally is made up of three parts?  I peel the entire banana, then break it in half and gently squeeze it, and this is how it naturally splits up.  AMAZING!!!  

I had a really good friend I met my first year of college who only ate his bananas this way.  He would only eat it piece by piece.  He didn't slice them, he didn't bit them with the peel.  He would peel the entire banana, break it up to the 3 pieces and eat one piece at a time, holding the ends like you would a watermelon, eat the center and then eat each end.
I never forgot this and I always make my sandwiches this way because I like how the bananas lay on the toast.

What's your favorite snack?
Thank you for checking in!
Sharon


Sharon Lim
Stampin' Up! Independent Demonstrator #54149
Rubber Stamps and Accessories including Scrapbooking 

EMAIL: sharonitwithyou@gmail.com
CELL: (707)486-3500

Sunday, April 12, 2015

Homemade bean and cheese burritos

I'm on another cooking from scratch kick...it TOTALLY satisfies the frugality/cheapness in me.
I made some refried beans from scratch.  

Here's the Pinterest recipe I used.
INGREDIENTS:
2 lbs pinto beans
1 large onion, chopped
4 Tbsp. jarred minced garlic
1 tsp salt
1 tsp pepper
2 tsp cumin
10 cups hot water
DIRECTIONS:
  1. Rinse beans in colander. Pick out the bad beans.
  2. Combine all the ingredients in the crockpot.  Remove any floating beans. Cover, and cook on HIGH for 4 hours and then on LOW for 2 hours
  3. Uncover, and remove extra liquid.  Leave enough liquid to reach the desired consistency when the beans are mashed.  
  4. Mash beans with a potato masher to desired consistency.
  5. Serve warm. Store in air-tight containers in the refrigerator and use within 2 weeks, or freeze in ziplock bags for later use.

After having some bean and cheese burritos for dinner, I got 3 quart sized ziploc bags full of beans to make more burritos later.
2 days later, I spread some beans and sliced up some cheddar cheese to wrap in some warmed up tortillas.  I ended up with 9 burritos total.  I ate one for dinner and wrapped the rest in ziplocs and froze them.
I like the my tortillas toasted so I put mine in a pan until it turned golden brown on both sides. YUM!!
Here are the rest of the burritos all packed up to freeze to eat later.
Do you have any good freezer recipes to share?
Check out my Freezer Meals Pinterest board
I want to try some some of freezer meals I've pinned, and if I deem them successful, they will then be pinned on my Pinterest WINS!!! board. 

Thank you for checking in!   
Sharon Lim
Stampin' Up! Independent Demonstrator #54149
Rubber Stamps and Accessories including Scrapbooking 

email: sharonitwithyou@gmail.com
cell: (707)486-3500