I am an Independent Stampin' Up! Demonstrator.
This blog is a place to share my creations to make you smile and sometimes laugh.
I love card making and scrap booking plus a WHOLE lot more! I am definitely a child of the 70's and 80's too! I LOVE Pinterest too!!
1. New Sale-A-Bration (SAB) items available starting on 2/4 and ending 2/28.
Still going on with Sale-A-Bration:
a. Earn FREE SAB items with every $60 or $120 purchase.
b. With a $300 workshop or purchase, you will earn an ADDITIONAL $30 to spend.
c. ALSO, ending on 2/28, Join Sale-A-Bration now!! When you join in February 2025 for $99, you will get $125 worth of merchandise, an exclusive stamp set, AND 2 of the Stampin' Up! color family marker sets.
3. Paper Pumpkin kits-If you want the February's kit, sign up before 2/10 for February's kit. What is Paper Pumpkin? A monthly crafting kit including, stamps, ink spot, and full kits (including adhesives, embellishments, and instructions) to make multiple items (cards, 3D items, etc.)
Today, members of the Luv 2 Stamp Group are sharing inspiration with you using @stampinupofficial products.
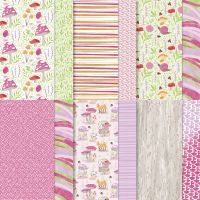
Inspired by Deb Joy Smeak (Delight of my Heart) I made these Hidden Pocket Bookmark cards using the Toadstool Gardens DSP that you can earn through my favorite time of the year, Sale-A-Bration. In January and February only, you can earn FREE items with eligible purchases of $60 or $120.
Click below to see a video tutorial showing you how you can make it yourself.
Please hop through the L2SG member list below to see all of the inspiration the team is sharing with you today!
1. The Jan.-Apr. and Sale-A-Bration catalogs start.
a. My Open House on Jan. 12, from 10:00am-3:00pm showcasing the new catalogs. RSVP via the link, so I can have a Make and Take ready for you. Click this RSVP LINK
2. One more month for Sale-A-Bration with new items!! And there is more to Sale-A-Brate!! New items have been added!!
3. TWO New kits available in February, available online only!
4. Join my teamfor only $99 and get $125 worth of merchandise and a choice of Stampin Glass Mat Studio a $60 value: Glassmat, Silicone mat, and cleaning cloth OR additional $30 free product. And no need to sell, you can enjoy a 20% discount!!
Are you thinking about getting the Mini Stampin' Cut & Emboss Machine? Click this link to Join my team before Feb. 28 and earn it with your Starter Kit!
Do you have one and needs some helpful tips? Look no further! Here are three tips for better cutting and embossing with your Mini Stampin' Cut & Emboss Machine.
SMALL BUT MIGHTY: HELPFUL USER TIPS FOR THE MINI STAMPIN’ CUT & EMBOSS MACHINE
Some of you are asking why the Mini Stampin’ Cut & Emboss Machine is so tight. Fair question. Truth is, this makes the machine better. We know this is a bold statement, but we’re going to say it anyway: this is the strongest mini die-cutting/embossing machine on the market. This has everything to do with the tight fit at the opening. With it, you can count on cleaner cuts and deeper embossing.
Of course, we realize the tight design of the Mini Stampin’ Cut & Emboss Machine can create a slight learning curve when it comes to feeding the plates through, so we’ve compiled a list of helpful tips to try.
TIP 1: Think “E”
When positioning your cutting plates and folders on the machine’s platform, create the shape of a capital letter E, with the top and bottom plates extending longer than the middle section (on the side that’s feeding into the machine).
See a picture of the E placement here.
Why E? The uneven placement allows the top and bottom plates to bend in slightly, giving the machine a better opportunity to grip the plates. The ends of the plates are beveled to help with the gripping and staggering your plates will allow for even more success when running your sandwich through the machine. When placing your dies or embossing folders in your sandwich, make sure to place them between the two beveled ends. Giving the bevel room to work will help ensure success. Your embossing folders are intentionally created to be slightly shorter than the plates, all for this very reason, but a little extra wiggle room is never a bad idea.
TIP 2: Stand n’ Crank
The lighter weight of the Mini Stampin’ Cut & Emboss Machine can cause it to feel less stable/anchored than the larger Stampin’ Cut & Emboss Machine. If you’re experiencing machine movement with use, consider standing up to use the tool. The added leverage created in this position can make all the difference. Also, make sure you’ve placed your machine somewhere that will allow the feet to grip the surface during use.
TIP 3: Plate Play
If you find your plate placement isn’t cooperating, even with the “E” in effect, your machine simply has a really tight fit and this isn’t bad! But, if you’re struggling, you can try switching your base plate from the suggested Plate 1 to Plate 3. Users have reported that this slightest decrease in height and subsequent pressure can be just enough to make a difference. Making this exchange will not void the warranty, but there is a chance it could impact the quality of your cuts. Things to consider as you explore options and approaches.
FINAL THOUGHT
It’s worth mentioning that the tips outlined here also apply to the regular Stampin’ Cut & Emboss Machine, making this a good message to both save AND share with your customers and team. For more information on the Mini Stampin’ Cut & Emboss Machine specifically, visit our website and check out this quick flick.