Sunday, June 19, 2016

New 2016-17 Stampin' Up! Catalog items!!

Had a great Stampin' Up! Open House this past weekend.  
Here are some of the samples I showcased.  These cards are made with the new Shooting Star stamp set, coordinating Sliding Star Framelits, and the new Foam Adhesive Strips.
I love not having to create the channels!!
I used the Serene Scenery DSP (Designer Series Paper) and Scenic Sayings stamp set.
I love the real pictures in this set of DSP.  I coordinated them with Serene Scenery Cardstock Pack.  I used the Pool Party and Crumb Cake.
I also created a card with the hostess set, Time of Year.
People who came to my Open House got a chance to create their own bookmark showcasing the new In Colors!! 
I stamped the circle on the left and they got to punch out a balloon and adhered it with a glue dot.  Then, they punched the bottom with the Banner Triple punch and the top with the Scalloped Tag Topper.  And lastly, they could choose 2 ribbons to attach to the top.
These cards I used a piece from the Affectionately Yours DSP, the Thoughtful Banners, and the Duet Banner punch.
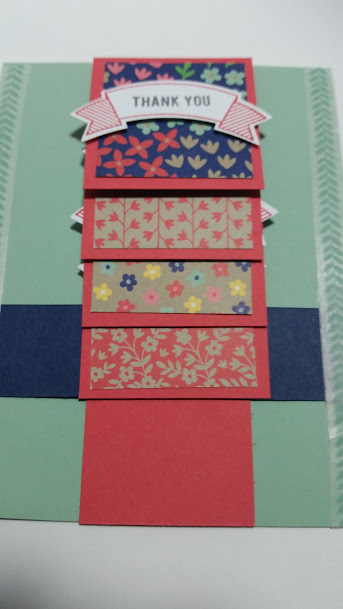
Here is a waterfall card using more of the Affectionately Yours DSP, the Thoughtful Banners, and the Duet Banner punch. 

For this card, I used the Sitting Here stamp set.  Instead of a swing, I cut off the rope and used it as a leg to make a bench instead.  I also used the Aqua Painters to color the bench cushion, pillows and sleeping dog.
 More fun with the Fox builder and Foxy Friends stamp set.
 A gate card using the Pop of Paradise stamp set.
I also tried a new box, called the Self-Closing Box and decorated it with some more Affectionately Yours DSP.  I will be blogging a tutorial on how to make this at a later date.  So fun!
Thank you for checking in!
Sharon


Sharon Lim

Stampin' Up! Independent Demonstrator #54149
Rubber Stamps and Accessories including Scrapbooking 

EMAILsharonitwithyou@gmail.com
CELL: (707)486-3500
PayPal.Me/SharonLim

Sunday, June 12, 2016

How to line up your photopolymer stamps with it's coordinating punch!!

So, I bought this set, Thoughtful Banners with the coordinating punch and I remember seeing a video showing you how to punch out the stamped images.  So, I wanted to share with you how I did it with the banner punch.
 I punched the banners out of scrap paper.
 I then place the photopolymer stamps in the holes, matching them up.
Then, I take the Clear Block C and place it on top of the stamps, and press it down.
 Then, I ink up the stamps and get the banners.
Punch out the banners.  See how it lines up perfectly?

 So, I slipped a couple of the templates into the plastic case so I can use them over and over.
Here is the card, and here is the tutorial on how to make this Waterfall card.
Here is the card in action.

Thank you for checking in!
Sharon


Sharon Lim
Stampin' Up! Independent Demonstrator #54149
Rubber Stamps and Accessories including Scrapbooking 

EMAILsharonitwithyou@gmail.com
CELL: (707)486-3500
PayPal.Me/SharonLim

Saturday, June 4, 2016

Chicken Pot Pie recipe


This is one of my FAVORITE recipes that I make at least once a month.  Here are my other posts about FOOD.   I also have a Pinterest Board of other recipes I have tried and liked. I call it PINTEREST WINS!!! 

Chicken Pot Pie
Here's the recipe to make 1 pie, but I always double the recipe and make 2 pies, so I can freeze the leftovers and have pie for lunch/dinner later:

Pillsbury Pie Crusts (One package has 2 crusts) 
2 cans of Cream of Potato soup
milk or water
1/2 tsp ground thyme
1/4 pepper

1-1/2 cups potatoes, peeled and diced
1-1/2 cups carrots, diced
1 cup of frozen peas
leftover cooked chicken

1 egg, beaten well with 1 Tbsp of water (This is the egg wash)

In a large mixing bowl, pour the cans of soup and add 1/2 can of milk (or water) and mix well.  Add thyme and pepper.

Boil the carrots and potatoes until fork tender. Place frozen peas in a colander and then pour the carrots and potatoes over the peas when they are done.  Rinse with cold water to cool slightly.

Add the vegetables into the soup mix and mix well.

Prepare the crusts (let sit out from refrigerator for 20 minutes) and then place into pie pan. Pour filling into bottom crust and spread out.  Roll out top crust onto filling and tuck the top crust behind the bottom crust.  (Some people like to trim the crust, but I don't like waste the crust, so I use all of it, it's my FAVORITE part).  Crimp the edges.
Cut out vent holes.  Again, I don't waste, so I cut out 3 leaves and put them next to the holes.  Brush the egg wash onto the top crust. 
Bake for 45 minutes until golden brown.  Remove from oven to cool before serving.
ENJOY!!!
There was a time where I got distracted and baked my pies and then realized I forgot an ingredient.  Can you guess what I forgot?
Thank you for checking in!
Sharon


Sharon Lim
Stampin' Up! Independent Demonstrator #54149
Rubber Stamps and Accessories including Scrapbooking 

EMAILsharonitwithyou@gmail.com
CELL: (707)486-3500
PayPal.Me/SharonLim