I am an Independent Stampin' Up! Demonstrator.
This blog is a place to share my creations to make you smile and sometimes laugh.
I love card making and scrap booking plus a WHOLE lot more! I am definitely a child of the 70's and 80's too! I LOVE Pinterest too!!
Hello, These are all the RAGE now days, and I couldn't WAIT to figure out how to make it! Inspired by Sasha's post and video, I made a version of this Pop Up Fold Card. Click on the video below to see it in action. Start with cardstock measuring 8" X 11" Score at 2" and 6" when vertical and then at 5-1/2" when horizontal.
Mark with a pencil 2" from the center on both sides on both score lines.
Then, score an "X" using the marks you made with a bone folder.
Fold the card in half and lay down with the fold to your left.
Mark 1-3/8" on the score line, and then 13/16" from the edge.
Repeat on the top score line and top of cardstock.
Draw a line from the two marks you made on the top and bottom.
Cut along the lines you drew.
Then cut along the score lines, you will end up with it like this.
This is what you should get when you unfold the cardstock.
Then, fold along the "X" you made, first one score, then the other score.
You should get this fold and when you fold it completely, you get this house shape.
Next, take a piece of Real Red cardstock measuring 2-3/4" X 11" and score at 2-3/4", 5-1/2" and 8-1/4"
Fold like an "M"
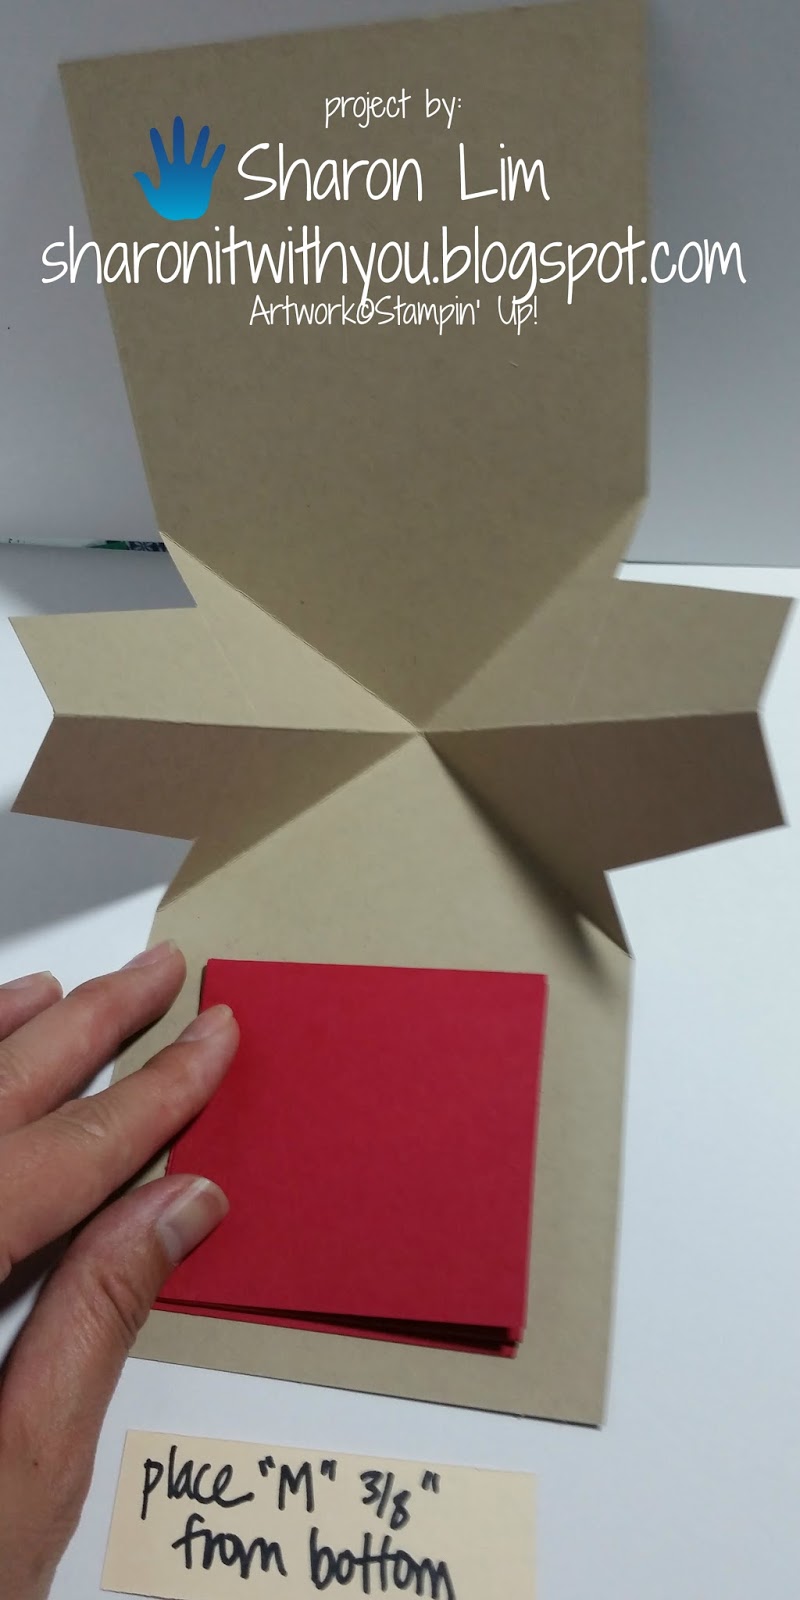
Cut out 2-1/2" Crumb Cake squares and 2-1/4" Whisper White squares to layer and layer onto the Real Red squares "M" shaped paper.
Place the "M" centered on the bottom about 3/8"from the bottom.
Place adhesive only on the spot on the picture.
Then, close the card so the adhesive hits the "M"
Then, flip the card over and place adhesive in the same place on the opposite side.
And fold the card closed.
Now, open and close your card to make sure it opens and closes.
For the inside layer, cut a piece of Candy Cane Lane DSP (Decorative Series Paper) that measures 5-1/8" X 3-3/4" and mark 3-3/8" on each side and cut from those marks to the center on the top to get the house shape.
Adhere the house shape to the top and bottom of the card inside.
Start with a 11" X 4" card base.
Adhere the pop up inside card to the card base.
Adhere a piece of Candy Cane Lane DSP measuring 5-1/4" X 3-3/4" to the front. Using the banner punch, punch the ends of a 1" piece of Whisper White and stamp with a sentiment in Real Red.
Here is the card opened up with images cut out from the Candy Cane Lane DSP.
Here is another card I made using the Here's to Cheers stamp set and Cheerful Tags Thinlits
I made another one for my niece for her 15th birthday.
Hello, Getting ready for Halloween!! I saw this card posted by Vinny Cespedes and had to make one. Here is my version opened up and closed:
Start with a piece of Pumpkin Pie cardstock measuring 4" X 12, scoring at 2", 4", 8", and 10" Mark the top and bottom at 6" and then, score from the top mark to both of the bottom 2" and 8" score lines, then score from the bottom mark to both the top 2" and 8" score lines. You will end up with this.
Fold in the ends and the "X" you scored. Here is a top view:
Here is another view:
When you close it, it should look like this:
I cut a piece of Basic Black that was 2-1/2" square and a Whisper White that was 2" square. I stamped a jack o'lantern in Pumpkin Pie ink on the Whisper White square. I also stamped 2 pieces of Whisper White measuring 1-3/4" X 3-3/4" for the side panels.
I also took a piece of Cherry Cobbler and a piece of Crushed Curry measuring 3-3/4" square.
And I cut them like this:
I used them to decorate the folded out parts in a pattern.
It's a polar bear I made with a 2-1/2" circle punch for the head, 3/4" circle for the ears in white and 1/2" for the nose in black. I cut an oval in half and rounded the top edges. The eyes are 1/16" punches in black.
I even used the Fringe Scissors to cut the fringe to look like icicles. Was inspired by Teri Suzuki.
The next one is my version of a S'more Snowman. I used two 1-5/8" squares and rounded the corners so they look like marshmallows and sponged the edges a little with some Early Espresso ink to simulate the roasting. A couple of 1/2" strips of Crumb Cake for the graham crackers and a couple of 1/4" strips of Chocolate Chip with notches to simulate the chocolate bars. The arms are from the Tree Builder punch with one of the branches cut off to look like sticks. Add a little Pumpkin Pie triangle nose and used a Sharpie for the eyes and mouth.


