Sunday, July 31, 2016

Another Z card fold tutorial!

Inspired by Meg Loven's post, I fell in love with this Z fold card.
I also blogged about this Z fold card earlier.
Here is my version of it.
You start with a piece of Basic Black that is 4-1/4" X 11", scored at 5-1/2"
 Using the largest framelit from the Lots of Labels Framelits, cut out the front of the card and then another one of the same size of Calypso Coral. Then, using the next size down, cut a label out of Whisper White.
 Using a piece of Whisper White measuring 8-1/2" X 2-3/4" and score it at 2-3/4" from both ends.
 You can fold it into a Z so it looks like this:
 Using the "You've Got This" stamp set, I stamped the image and words in Basic Black ink on the Whisper White label.  
Then, I used the Aqua Painters to color the flower, using the Calypso Coral, Daffodil Delight, and Wild Wasabi ink. I squeezed the ink pad while it was closed and then opened the pad up like the picture below to use it as a painter's palette.  I dip the Aqua Painter in the ink and "paint" the image.  To change colors, you just "clear it out" on a piece of scratch paper until the water runs clear and then use a different color.
Next, I adhered the stamped image to the Calypso Coral piece I cut out earlier.
 Then, adhere the layered label on top of the Z fold you folded earlier like this:
 And this is how the card should look:
I love how the label fits right into the front frame and then it can stand on its own.
Thank you for checking in!
Sharon


Sharon Lim
Stampin' Up! Independent Demonstrator #54149
Rubber Stamps and Accessories including Scrapbooking 

EMAILsharonitwithyou@gmail.com
CELL: (707)486-3500
PayPal.Me/SharonLim

Sunday, July 24, 2016

Shadow Box tutorial!!

Hello,
I watched this video made by Caroline Wright on how to make a Shadow Box, and now I can't stop making them.
Start with a 8-1/2" square and score on all 4 sides at 1/2", 1", 1-1/2", and 2".
 Then, only score to the second score line at 2-1/2" and 6" on only the top and bottom.
 Cut off all 4 corners of the paper, you will cut off 2" squares.
 Cut diagonally on both sides.
 Then, cut off the tabs, so it looks like this:
 You will end up with the paper that looks like this:
 Make sure you crease all the score lines on all four sides.
 Apply adhesive on the ends of the cut ends first and roll the side until you create a side to the frame.
 Repeat with the adhesive on the other two sides and roll them into the sides you just created.
 Tah-dah!! You get a nice square frame!
Here are 2 samples with the new Ronald McDonald House stamp, new badge punch and embossed it with Clear Embossing powder.  Every year Stampin' Up! creates a stamp, and for every stamp you buy, they donate $5 to the Ronald McDonald House Foundation.
Thank you for checking in!
Sharon


Sharon Lim
Stampin' Up! Independent Demonstrator #54149
Rubber Stamps and Accessories including Scrapbooking 

EMAILsharonitwithyou@gmail.com
CELL: (707)486-3500
PayPal.Me/SharonLim

Sunday, July 17, 2016

Making my vegee tray!!

Hello,
I always make a vegee tray for any party/event I organize or attend.
The one thing I always get questions about is the jicama. 
"What it that?" 
"What does it taste like?" 
"How do you serve it?" 
I buy it so often at Raley's I even know the vegetable code (#4626) for it and have to tell the cashier if they don't know what it is and I tell them and then tell them to code to punch in.  
This is what jicama looks like when you buy it.
I first start with peeling it with a knife.  If you don't peel enough of it, it still has some fibrous parts that are hard to chew.
Once the peel has been removed, it looks like this:
I start by cutting it in half first.
Then, into planks, then into strips.
For the celery, I take off the out stems and wash them first.  Then, I cut off the white ends.
Next, I cut off the leafy tops.
You end up with many stalks.  If they are too wide, I cut them in half first.
Then, I cut them into bite sized sticks.
For bell peppers, I choose one of each color.  I was told that the ones with the 3 bumps are good for snacking and the ones with 4 bumps on the bottom are good for cooking.
First, I cut off the top.
Next, I cut off the bottom.
Then, I stand it on it's end and cut a slit down the side.
Then, I run the knife down the sides so you are cutting out the middle of the pepper.
You end up with the center in one piece and a strip of the pepper that you can cut into smaller snack sized strips.
Nothing goes to waste, I bring this bag to my sister and brother-in-law's ranch to feed the chickens and pigs.
Here is the finished vegee tray.
Thank you for checking in!
Sharon


Sharon Lim

Stampin' Up! Independent Demonstrator #54149
Rubber Stamps and Accessories including Scrapbooking 

EMAILsharonitwithyou@gmail.com
CELL: (707)486-3500
PayPal.Me/SharonLim

Saturday, July 9, 2016

Z fold card tutorial with Vertical Greetings stamp set

I learned to make a Z fold card and loved the look of it. Here is the front of the card and the side view of the card when it is opened.
Start with 2 pieces of Calypso Coral measuring 4-1/4" x 5-1/2."
They are the front and back of the card.
Take a piece of Very Vanilla that measures 3" x 11" and score it at 4-1/2" and at 9"   This is the inside of the card.
Fold the inside of the card like the picture below:
Place adhesive on the short fold of the inside of the card.
Place it on the back of the card and lay the rest of the inside of the card so it is centered.
I should look like this when it is closed.
Then, place adhesive on the top of the inside of the card.
And place the top of the card on top, matching up the front and back of the card.
This is how the card looks like opened.
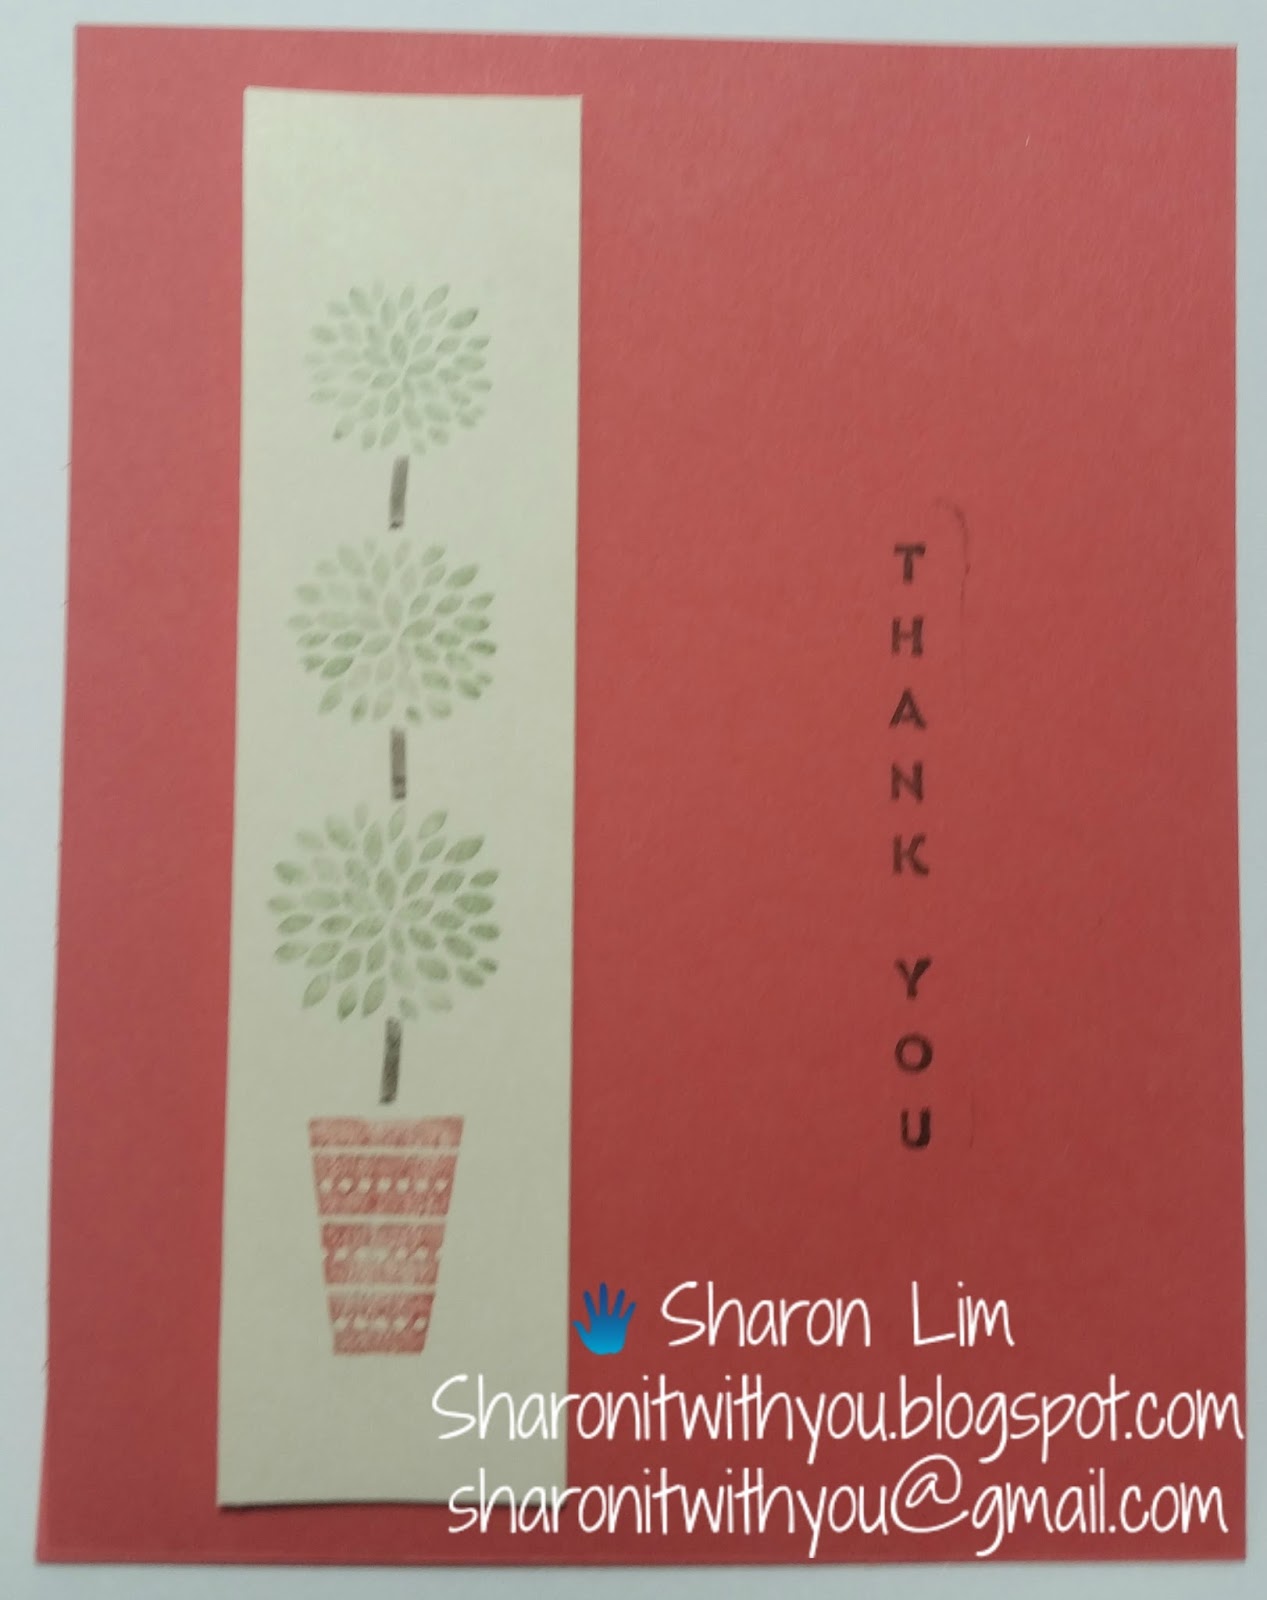
To decorate the front of the card, cut another piece of Very Vanilla measuring 1-1/4" x 5" Using the brush side of the Calypso Coral, Wild Wasabi, and Early Espresso markers, and color the topiary stamp. Huff it a bit before you stamp it on the Very Vanilla cardstock.

This is the front of the card.  I adhered the stamped image using Stampin' Dimensionals.  I also stamped the Thank You on the front using Early Espresso.
Here's another version of this card using Bermuda Bay, Crushed Curry and Melon Mambo.

Thank you for checking in!
Sharon


Sharon Lim
Stampin' Up! Independent Demonstrator #54149
Rubber Stamps and Accessories including Scrapbooking 

EMAILsharonitwithyou@gmail.com

CELL: (707)486-3500
PayPal.Me/SharonLim