Saturday, July 28, 2012

Another card making class!!!

I had a FABULOUS time with my stampers:  Nanci, Andrea, Rhonda, Shelley, Debra and Kayla today!
Here's the first card, using a technique called Triple Layering technique I copied from Gloria Plunkett at:  http://www.designzbygloria.com/my_weblog/2012/07/very-cool-cards.html using the Reason to Smile stamp set.  Don't you just love how it looks?
 Here's another one using the stamp sets, Mixed Bunches and Oval All.  I LOVE how the stamps match the punches exactly!
 Now comes a technique I call, the "moving box."  I used 2 double sided papers cut to 3" X 6" and scored at 1.5" on each side. Then, layer them like a "t" and then fold it like you would when you are packing a moving box.  I accented the plain squares with the stamp set "A Fitting Occasion"


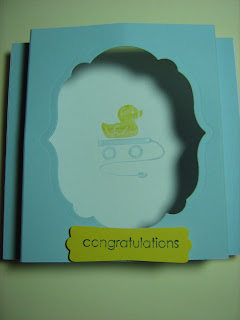
 I wasn't sure what kind of card people needed, so I gave them the choice of a birthday, baby, or wedding card. I used the technique called "Shadow Box" card and thought it would look even cooler if you embossed the front or left it alone like with the baby one.  They could choose the Square Lattice" like in the bday one or the "Perfect Polka Dots" like in the wedding one.
 To give you an idea of how the Shadow Box cards look like, here's a top view of them.  And they fold so you can mail them! How cool it that?
And of course all of my stampers came away with a gift from me!  These are candy holders full of M&M's with a topper made from a piece of cardstock folded in half before I punched it with the scallop circle so it became a card that you can sign inside of it.  Oh, and of course, everyone had Rice Krispy Treats...that's a given!

My next class will be on October 6th.  Hope you can make it!

Well, thanks for checking in!
Sharon

Monday, July 23, 2012

Using WHAT I got!

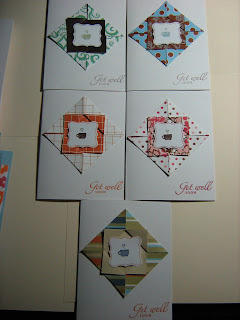
So...I did a little stamping this weekend...just a little!  My sister, Betty asked me to make some cards for her co-workers and I was determined to ONLY use the materials I had at home.  They wanted Thank You, Get Well Soon, Birthday, and Bereavement cards.  I even snuck in some Christmas cards too. 
 This card is one I made before with the Blossom punch.


 I had lots of squares leftover from another project, it's one of my favorite folds and it also highlights a new stamp set, A Fitting Occation, I just bought in the new catalog.


Here's another Get Well Soon card I was trying to make look like a band-aid.
I am totally obsessed with weaving ribbon and LOVE this wreath and candy cane I made.

Here's a card I "cased" from Gloria Plunkett http://www.designzbygloria.com/my_weblog/2012/07/very-cool-cards.html


Thanks for checking in!
Sharon

Tuesday, July 17, 2012

Wedding invitations

A co-worker asked me to make these invitations for her wedding in September, she sent me the picture above.
Check it out!  How do you think I did?
 Here is the inside of the card, it slides out of the black pocket and is tied with a lovely satin orange ribbon.
 For the RSVP card, I made a postcard with their names on one side and stamped a Cala Lily on the side you put the address and response.
I was working on them all weekend long.  What do you think?
It was really fun and I love how they turned out.
Thanks for checking in!
Sharon

Tuesday, June 12, 2012

Making cards in June!

 
I can't believe my nephew, Jose, just graduated high school last Saturday.  To celebrate this milestone and allow others to make cards for the graduates they know, the first card was a grad card.

 Next, I used the Blossom punch and "CASED" a card from Cindee Wilkinson's blog.
 Lastly, was a Father's Day using the Labels Collection Framelits in two different sizes to fit perfectly together.  And I added a couple of car punches to make a "manly" accent.

Thanks for checking in!
Sharon
P.S.  I have this year's Father's Day cards done, but I can't show them until all the fathers get theirs.  Stay tuned!

Tuesday, May 22, 2012

Monthly Technique Challenge!

Hello there,
My upline, Patty, sent a challenge to my Stampin' Up! group.
You try a different stamping technique and share your creation with the rest of the group in order to be entered into a contest for a FABULOUS prize of a $50 shopping spree from the new catalog.  This month is the first month, so here goes...

The technique is called Embossing Resist.  You use white embossing powder on a stamped image and then sponge ink onto the image.  Then, you use a tissue to wipe away the ink on the image and you get something that looks like it has been highlighted in a very special and unique way. 
I was inspired by a card I saw on Pinterest, here's my card:
I used the new set, Memorable Moments, Daffodil Delight and Cherry Cobbler.  I used clear embossing powder with Versamark on the numbers up top, then used the White embossing powder for the Happy 30th Birthday sentiment and inked it with Cherry Cobbler. And to add a little bling, I put some rhinestones on.
What do you think?
Thanks for checking in!
Sharon
Monday, May 7, 2012

Butterflies!!!

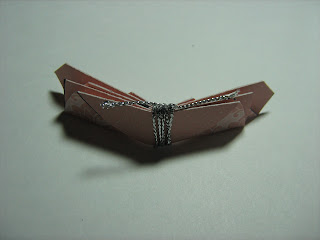
Don't you LOVE this butterfly?  It is an inspiration from Susan at http://www.papercraftcentral.com/paper-butterfly.html  For my first attempt I used 6"paper, 4" circle and scored it with my Simply Scored Scoring Tool.
Then, I thought, "Why not use the Designer Rosette Bigz XL Die to do the scoring for me?  So I started with a  4" square of DSP (Designer Series Paper) and traced a button container.
 Then, I cut at 1/1/2" on both ends until you end up with a shape like this.

 Then, place it on your Designer Rosette Bigz XL Die and run it through your Big Shot, making sure that the paper is lined up so the lines will be straight.
 This is what you get once you run it through the Big Shot.   SO much easier than scoring every 1/2" with the  6" butterfly I made first.

 Fold it in half and crease the lines very well.
 Use some cord or you can use ribbon to tie it and act as the butterfly's body and antennae.
 Use both hands and squish the tops and bottoms together to "puff" it to look like a butterfly.
What do you think? Thanks for checking in!
Sharon

Saturday, April 14, 2012

My latest card making class!!!


Had a great card class today. Check out these AWESOME cards!
The first one is called the Interlocking Gate Fold Card. I used the Labels Framelits Dies. I LOVE how they each nest within each other perfectly. I also used a techniques I saw shared by Margaret de Witt. Cool, eh?
Next card used the Embossing Folders before I used the Blossom Punch. It gave each flower a different texture. What do you think? I also love how the stamp set goes with the punch. I used Versamark ink on the So Saffron one before punching it out.
Next is a Father's Day card. I folded some DSP (Designer Series Paper) into a shirt and put on some mini clear buttons.
And everyone got a lovely handmade box to hold all the cards they made along with their envelopes. I used the Scallop Envelope Die.
Save the Date for the next card class in July 28th.
Thanks for checking in!
Sharon