Monday, August 13, 2012

Wedding cake card!!!

WHAT?!! Three posts in a row?  WHEW, I am on a roll...ENJOY!!!
I wrote these instructions in my sketch book to try it out and forgot to write down the website I got it from, sorry about that!
 Starting with Sahara Sand cardstock, cut to 4-1/4" X 5-1/2" and folded in half, I used the Scallop Trim Border punch for the edge.  
Then,using the Embellished Events stamp set (#126497-clear, $20.95 or #126495-wood, $28.95), I embossed the bells with white embossing powder on a 2" square of  Sahara Sand mounted on top of another 2" of Whisper White.  
Then, I  stamped "Congratulations" with the set, Perfect Punches (#126497-clear, $27.95 or #126495-wood, $24.95)
For the inside, use a piece of Whisper White,  cut to 4-1/4" X 5-1/2" and folded in half.  While you have it in half, and cut starting at the fold
  • at 3-7/8", cut  to 2 inches
  • at 2-7/8", cut  to 2 inches
  • at 1-7/8", cut  to 1-1/2"
  • at 1-1/8", cut to 1"
I should look like this:
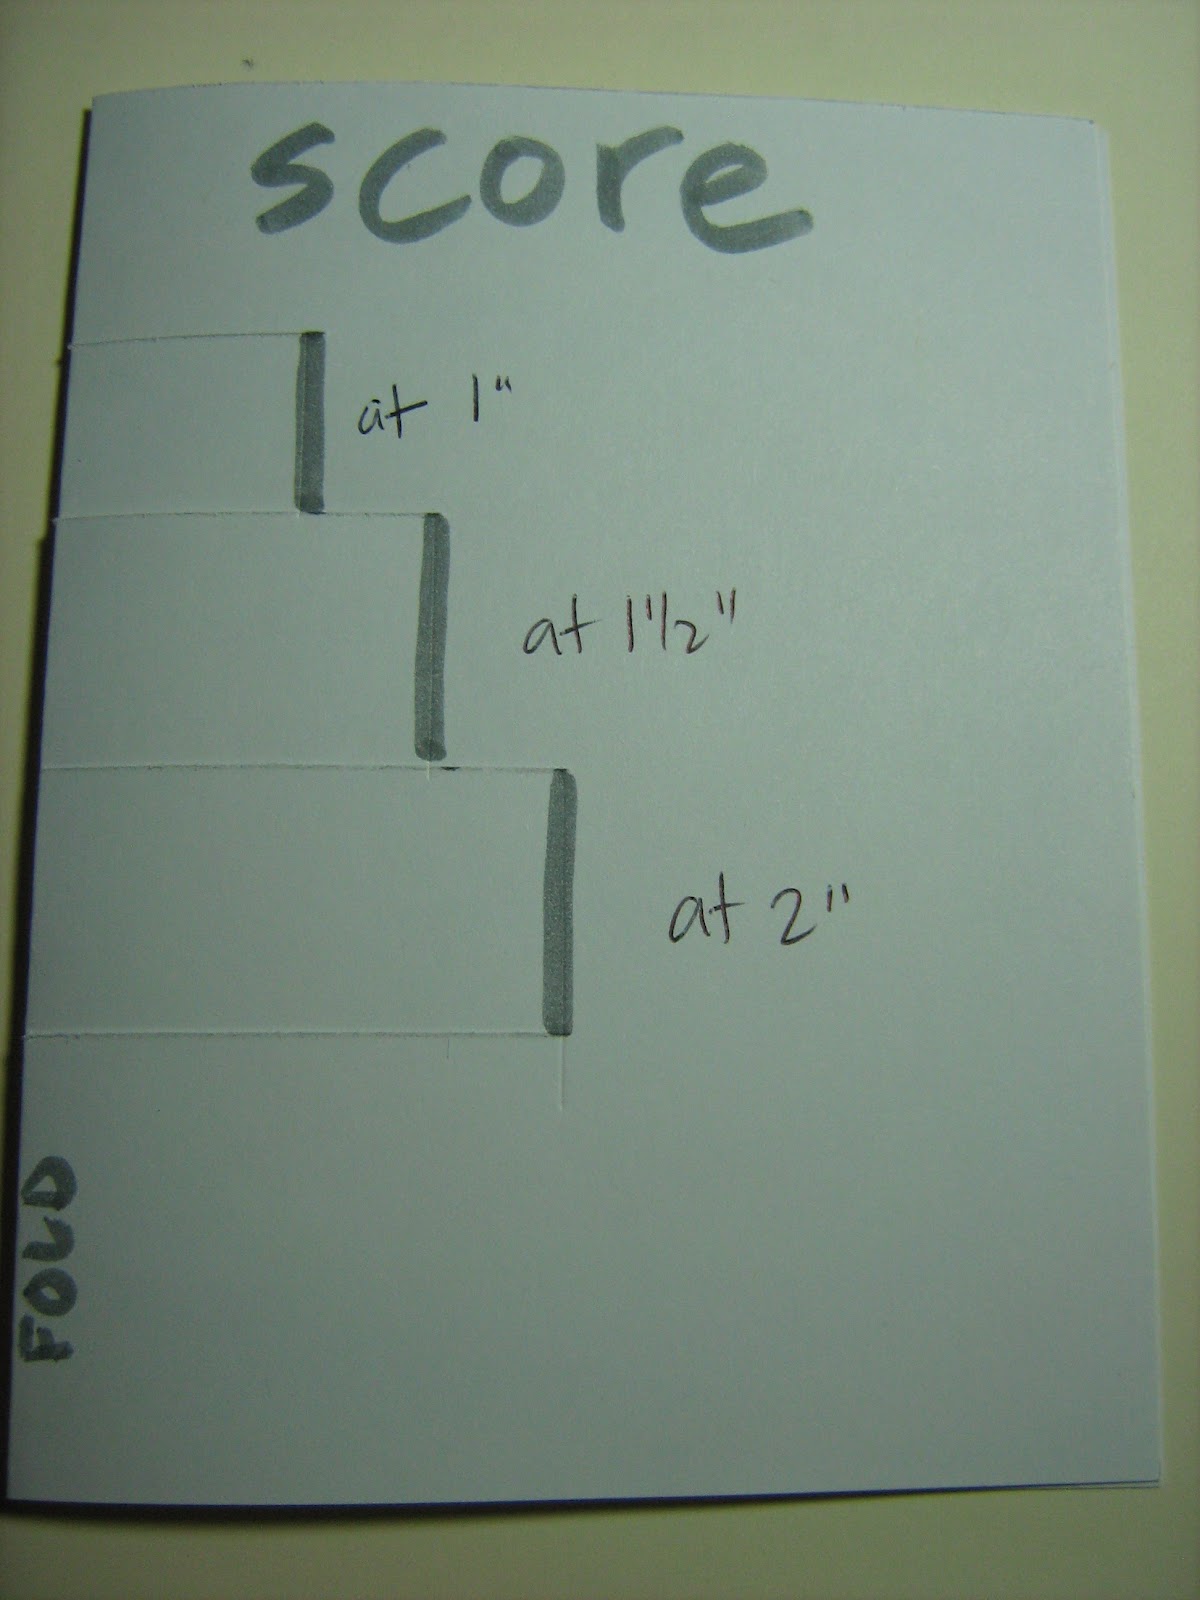
Then, turn the card vertical and score, at the following:
  • starting at the first cut to the second cut, score at 1"
  • starting at the second cut to the third cut, score at 1-1/2"
  • starting at the third cut to the fourth cut, score at 2"
Fold in at the folds to look like this:

Then, reverse the folds so it looks like this on the inside:
Cut out these for the papers to cover the folds:
  • 3/4" X 2" (I did this with the Stripes Folder)
  • 1" X3" (I did this with the Perfect Polka Dots Folder)
  • 1" X 4"  (I did this with the Stripes Folder)

Fold all three papers in half and adhere to the folds you made.  I added a couple of embossed champagne glasses from the Embelleshed Events stamp set.
TA DAH!!!
What do you think?

Here's BONUS steps on making a Butterfly using the Rosette die:
Thanks for checking in!
Sharon


Sunday, August 12, 2012

Inspired card using my prize from the card contest!!!

Was it just me, or did you see this in the catalog, and WANTED to make it?


Well, I did with some Garden Green cardstock and running it through the Rosette Die.  It seemed really stiff and was thick when I folded it up.

So, when I won the card contest with all this stuff from the Holiday Catalog, I looked at the paper from the Festival of Prints Designer Series Paper Stack (#126904). It's the paper that is 4-1/2" X 6-1/2" and double sided.  
The math geek in me and the "don't want to waste any paper" me went to work.
So, if you cut it at 1", then 1-1/2" what you have left is 2"...how AWESOME is that?

Then run it through the  Rosette Die, making sure you line up the top edge along one of the score lines. Determine what side is going up and line them all up the same way.
Then, cut some sticky strip and place it on each end, making sure you are doing it all the same on each strip.


Cut a piece of Chocolate chip about 1" wide, and score it at 1/2" at each end.

put sticky strip on each end and fold it like so.

Peel off the sticky strip on each strip, starting with the smallest one and place it along the crease of your card and continue with the other strips, lining them up about 1/2" between them.  Then, add the Chocolate Chip trunk.
So, what do you think?
Thanks for checking in!
Sharon


Saturday, August 11, 2012

My latest card!!!

Here is the card I created for the card contest for the Stampin' Up! meeting I attended today.  And guess what?  I was one of the top 3 in the card contest!!! YAY!!! 

Here's the pink version of the card.  It's called a Shadow Box Card I saw from Dawn Griffin Splitcoast Stampers.  Here's the original tutorial.
Here's my version.  Start with a Whisper White cardstock measuring 4-1/4" X 5-1/2" ( a quarter sheet of a 88-1/2" X 11" sheet).  Score it 1/2" and at 1" on both sides of the short sides. 
Then fold it up at the 1" score mark...

 then fold it out at the 1/2" score mark...
 and place Sticky Strip on the "ledge" you just created.  Cut out another piece, the same size, but in a color cardstock and score it the same, at 1/2" and 1".
Use the Framelits to cut out the hole, save the punched out paper for later.
Then, run the colored cardstock through an embossed folder. Fold it just like the white piece, in at the 1" and out at the 1/2".
Then, fit the two pieces together.

Stamp your image, layer using the saved colored cardstock and stamp a label with your caption.  
TA DAH!!!
And what did I win?  A sampler of the Holiday catalog items...cool, right?
And guess what? My prize inspired me to make something.  Check out my next blog post!
Thanks for checking in!
Sharon


Monday, August 6, 2012

Mother's Day Cards

 Here are the Mother's Day cards I made this year.  Don't you LOVE them?  I was inspired by France Martin aka "Frenchie" at www.frenchiestamps.com. And I added a Framelits Labels Die for the Mother's Day part.  This is what they look like when they are in the envelope. See how they open up?


 Here's the card with the butterfly I made added.
So, what do you think?  Now I have to think what to do for my Father's Day cards...hmmm...I've got to start brainstorming now.
Thanks for checking in!
Sharon