Saturday, August 31, 2013

Box Card out of 8-1/2" by 11" Cardstock

For my cousin's daughter's wedding, my mom asked for a wedding card to hold a Lai-see (red envelope).  Red and gold are symbols of good luck and fortune.
So, this is what I came up with!  A box card to hold the envelope with a belly band to hold it all together. 
 This is the inside with a gold embossed wedding cake.
 Perfect fit for the envelope to sit in!
I started with a 8-1/2" by 11" piece of cardstock and scored it while it was in Landscape at 1-1/4", 3-3/8", 7-5/8" and 9-3/4".  Note, I just marked the 5-1/2 on the top and bottom to help with the diagonal scores.  Then, I turned it to Portrait and scored it at 2-1/8" and 6-3/8"
Then, I used scored the diagonals from score line to score line.
 Fold and crease well with a bone folder all of the lines, including the diagonals just as the picture depicts.


 Fold out the edges, then in the next folds to make it look like this:
 Flip it over and fold in diagonals on both the top and bottom.
 Flip it over again, and this is what you should see.
 Fold in the diagonals on one side, both on the top and bottom
 Flip to the other side and repeat the folding.
 This is what you should end up with. Make sure you use a bone folder and reinforce all the folds.
 And Tah dah!! It should open like this!
 Cut a piece of Whisper White Cardstock that measures 4" by 4" to decorate and adhere to the inside.

The belly band is 8-1/2" by 1-1/4" and scored at 2-1/8" fom each end.
 Lay it down and put the box card on top and fold it around.
 Cut out matching Label Framelits and attache it to the belly band.
What do you think?
I'm already thinking I can make Christmas ones that look like Santa with a black belt with a silver buckle for Holiday gift cards...that's next!!!

Thanks for checking in!
Sharon EMAIL: lim5harona@gmail.com

Sunday, August 25, 2013

Another wedding card box!!!

I received a request to create a gift card box for co-workers who recently got married.  I started with four 8" X 10" frames and took to my sketch book and started making a plan.
And being a fan of recycling/reusing items, I used the cardboard backing of flipchart paper to create the box.  How did I do? See?  I even included the tabs!
 Breaking out the hot glue gun, I glued it all together to create the box, covered the top of the box with scrapbook paper, cut a slit into the top, inserted the pictures in the frames and then hot glued them onto the box.
Then, as a finishing touch, I die cut some flowers and adhered them on top, and then I glued on blue ribbon in between the frames.
What do you think?
Thanks for checking in!
Sharon EMAIL: lim5harona@gmail.com

Saturday, August 17, 2013

Weaving the Chevron punch strips

I just attended my quarterly Luv2Stamp meeting and had a great time with my fellow demonstrators.  We chat, share, and craft together.
We also do a swap where everyone makes 22 card fronts, only the front (not a complete card) and we swap with everyone until everyone gets all 22 different card fronts.  It's a great way to share ideas and have samples to share with others without having to make them yourself.  
Here is my swap:
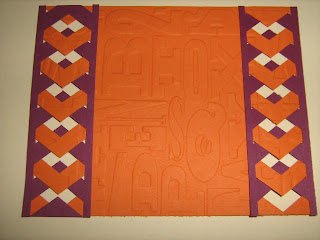
I used a ton of items from the Holiday catalog.  Pretty Print Textured Impressions Embossing Folder, Expressions Thinlits Die, and the Chevron Border Punch.
Want to know  how I created the cool border? I was inspired by the "Lattice" look I've seen on other cards. 
I used some Real Red and Old Olive scraps the length I wanted them to end up and punched them, making sure that I lined it up with the edge so that it was straight.  
 Then, I trimmed the opposite side to equal the side I punched.  It's about 1/8" from the edge.
 I laid the 2 strips in the opposite direction.
 Laid them on top of each other, with the tips of the chevrons touching.
 Then, you tuck in each tip behind the chevrons, and then pull the strip until it shows/covers the strip until you see this design.
 If you flip it over, you get this design.
 Which do you like better?
 I also tried it with different colors, Rich Razzleberry and Pumpkin Pie.
 Rich Razzleberry and Old Olive.  It's so great not having to cut each line yourself, and they are all lined up and even, so it all proportional.
 I LOVE the Expressions Thinlits Dies too, you put them through your Big Shot and it cuts out these FABULOUS words...I saw a video on YouTube that advises you to use wax paper on top of the cardstock that you are cutting so that the letters come out easier.  And using the paper piercer helps take it out because there are holes in the dies that allow you to push out the paper...GENIUS!!!
Thanks for checking in!
Sharon EMAIL: lim5harona@gmail.com