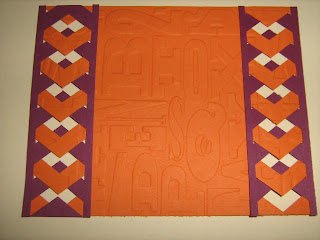
I just attended my quarterly Luv2Stamp meeting and had a great time with my fellow demonstrators. We chat, share, and craft together.
We also do a swap where everyone makes 22 card fronts, only the front (not a complete card) and we swap with everyone until everyone gets all 22 different card fronts. It's a great way to share ideas and have samples to share with others without having to make them yourself.
Here is my swap:
I used a ton of items from the Holiday catalog. Pretty Print Textured Impressions Embossing Folder, Expressions Thinlits Die, and the Chevron Border Punch.
Want to know how I created the cool border? I was inspired by the "Lattice" look I've seen on other cards.
I used some Real Red and Old Olive scraps the length I wanted them to end up and punched them, making sure that I lined it up with the edge so that it was straight.
Then, I trimmed the opposite side to equal the side I punched. It's about 1/8" from the edge.I laid the 2 strips in the opposite direction.
Laid them on top of each other, with the tips of the chevrons touching.
Then, you tuck in each tip behind the chevrons, and then pull the strip until it shows/covers the strip until you see this design.
If you flip it over, you get this design.
Which do you like better?
I also tried it with different colors, Rich Razzleberry and Pumpkin Pie.
Rich Razzleberry and Old Olive. It's so great not having to cut each line yourself, and they are all lined up and even, so it all proportional.I LOVE the Expressions Thinlits Dies too, you put them through your Big Shot and it cuts out these FABULOUS words...I saw a video on YouTube that advises you to use wax paper on top of the cardstock that you are cutting so that the letters come out easier. And using the paper piercer helps take it out because there are holes in the dies that allow you to push out the paper...GENIUS!!!
Thanks for checking in!
Sharon EMAIL: lim5harona@gmail.com
 Follow @sharonalim


No comments:
Post a Comment