
Welcome to the Luv 2 Stamp Group’s 2023 Blog Hop! We are excited to share projects with you again for the third year. This year we are shaking things up and bringing you all new monthly themes to inspire your next project!
Once you are done with each post, scroll down to the bottom and you will see a list of Blog Hop participants, you can click on their name to go to their post, or you can click the next button to go to the next post in line. Happy crafting!
This month's theme is Sweet Treat (3D project)
Have you seen an Explosion Box before? This one doesn't have any flying butterflies jumping out at you, but I still love it.
Scroll down to view a full video tutorial at the bottom of the blog post.


Start with a 12" X 12" cardstock and score at 4" on all sides. Repeat with a second cardstock measuring 11" X 11" and score at 4" on all sides.


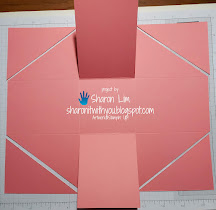
Cut as shown below on both sheets of cardstock.


Then glue to make 2 pockets for the first level. and cut the corners as shown below for the second level.
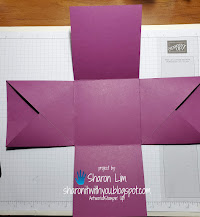
Glue the triangles as shown for the second level. and glue it on the center of the first level, making sure the pockets are on opposite sides.

For the lid, start with a piece measuring 6" X 6" and score at 15/16" around all 4 sides.
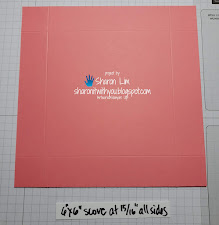
Cut the corner flaps as shown and glue the tabs to form the lid.


For the gift card holder, start with a 4" X 4" piece of Basic White and score at 1/2", 1-1/4", 2", 2-3/4", and 3-1/2". Fold it accordion style as pictured.

Glue only the edges of the center fold to form the gift card holder and pinch until the glue dries.


Cut off edges off as triangles as shown.


You can test out the holder to make sure it holds your gift card.


Here is the finished lid on top of the box.
Here is the full video tutorial to make this explosion box.
For more inspiration from the Luv 2 Stamp Group Blog Hop Team, click on the image below to visit the talented Laurie Bradshaw. Don't forget to continue following links on each blog to see everyone's projects!

Luv2Stamp Group Blog Roll-January 2023
Sharon Lim, CA (YOU ARE HERE!)
- Signing up to get my blog posts
- Subscribing to my YouTube channel
- Shop with me for FABULOUS Stampin' Up! products
- Join my team and enjoy 20% off (or more) with no selling!
- Any questions? Email me at sharonitwithyou@gmail.com and I would be happy to help!
Thank you for checking in!
Looking forward to sharing more with you next time.
Sharon
Looking forward to sharing more with you next time.
Sharon
CLICK ON THE IMAGES BELOW TO ORDER SUPPLIES TO MAKE THIS CARD
")


")
 Cardstock")
 Cardstock")
Sharon Lim
Stampin' Up! Independent Demonstrator
Rubber Stamps and Accessories including Scrapbooking
You have outdone yourself with the project! Wow! Whoever receives this is going to LOVE it!
ReplyDeleteyou simply amaze me with your projects. WOW
ReplyDeleteFabulous project! You make this seem so easy.
ReplyDeleteAmazing! I love this with the gift card holder and the pockets!
ReplyDeleteLovely project. Detail of directions and all the pictures are fantastic. I'll have to try this!
ReplyDeleteSuch an awesome project! Thank you for the detailed directions!
ReplyDeleteI LOVE THIS! I have GOT to make one of these. This is very cool. <3
ReplyDelete