Thursday, October 31, 2013

Popcorn Halloween costume

A co-worker of mine showed me this picture of this costume for her and her baby found on Pinterest.
I told her to buy some white and red felt and I went to work! I cut the top of the white felt in a zig-zag pattern using a small triangle as a template.  Then, I cut the red felt into 1 inch strips.  I hot glued the strips onto the white felt.  Next, I die cut the letters to spell out "popcorn" and hot glued them onto another strip of white felt and glued it to the center of the popcorn bag.  I used some leftover felt and cut out 4 strips and safety pinned them to the four corners in order for her to tie it to the baby carrier.

This is what I made:

She couldn't find a red bow tie, so I cut some of the leftover red felt and used a little strip to make the middle and used a safety pin to hold it together and to pin it on.


Then, she popped some popcorn and I showed her how to hot glue it to the baby hat.

What do you think?

Thanks for checking in!
Sharon
EMAIL: lim5harona@gmail.com

Sunday, October 27, 2013

Gift card holder using the envelope punch board

I just attended a meeting with some of my Stampin' Up! demonstrators today and we did a shoebox swap. It's when you prepare a card for everyone one to make and you spend some time making everyone's cards and go home with a whole selection of cards.  It was a day of stamping fun!!

Here is my card.  It's a gift card holder I CASE'd (=Copy And Shared) from Wendy Cranford.
Start with a 4-1/4" X 11 that has been scored at 2-1/2".
 Fold over on the score line, and place adhesive on both edges to form a pocket for the gift card.
 On the opposite end of the card, use the envelope punch board and punch at 1"
 Flip the paper over and punch at 1" again
 Tuck the center of the punched end into the pocket you created and gently fold over the cardstock.
 Use a bone folder to make a stronger crease.
 Emboss a 4"x 4" piece of Cord'nations with the Pretty Print Textured Impressions Embossing Folder, rub lightly with a sanding block, and then cut at 2'1/4".  Adhere to the top and bottom of the card.
 Place some Seasons of Style Designer Washi Tape on the edge of the bottom pocket.
Attach a bow made from the Crumb Cake seam binding with a glue dot and tuck the top part into the pocket.

What do you think?
Thanks for checking in!
Sharon
EMAIL: lim5harona@gmail.com

Saturday, October 19, 2013

My next card class is Nov. 16th!!! 10 am-12 noon!!!

I had an AWESOME card class today at It's all about the Scrapbook in Dixon.
We made these cards. They were all made from punches.  It's a trend called "Punch Art."
What do you think? You can get more details on this blog post.
My next class will be on Saturday, Nov. 16, and I decided to do a variety of gift card holders pictured here:
The first one is my favorite.  It's a box card that I made to look like Santa.  It's made of one sheet of paper with a lot of folds and a belly band that looks like Santa's belt.
 You slide off the belly band...
 And you can put your gift card inside, how cool is that?
 Next one is a twisted card
 Open it up and the gift card goes inside.
Next is the beanie card, another one of my favorites.
 Here it is opened with a gift card inside.
Last up are a couple of gift card holders made up of a quarter of a sheet of paper, stamped on the outside with Versamark, hole  punched and stringed with a ribbon to hold the gift card.
 See how the gift card pulls up with the ribbon?  Cool, huh?
If you are interested in taking this class at It's all about the Scrapbook in Dixon, it's $10 for these 5 gift card holders.  Bring your own adhesive, paper cutter and scissors.
To sign up for a class, send a check made out to, "It's all about the Scrapbook" with the date of the class and your name to:
It's all about the Scrapbook
1670 N. Lincoln Street, Suite B
Dixon, CA 95620
or call 707-676-5252 with the date of the class, your name and your credit card information

Thanks for checking in!
Sharon
EMAIL: lim5harona@gmail.com

Friday, October 18, 2013

Boss' Day card for our group to sign

Did you know it was Boss' Day on Wednesday, Oct. 16th?  I didn't either, but when our admin was planning a fun surprise Friday morning with some sweet goodies and balloons.  She mentioned that she was going to the store to see if there still were Boss' Day cards, so I said, "I'll make one."
Here it is closed with the words written with the chalk pen:
I added 2 more cards in between the 2 Thinlit cards so that EVERYONE could sign it.  Here it is opened.
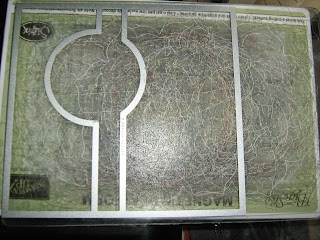
I used the Circle card Thinlit Die, and used my magnetic platform.  I LOVE how the die just "sticks" to the platform and there is no way for it to move or shift.
I cut 2 cards using the die using half of a 8-1/2" X 11" sheet of cardstock. See how I "weaved" the cardstock under the left side and kept the right side over the die.  Normally you would just get a regular sized card if you later the paper on top of the platform and the die on top of it.
Once you get 2 cut, you fold them following the lines made by the die in opposite directions, first as a mountain fold and the second score line as a valley fold.  You will have an extra line where the cardstock hangs over the die.
Then adhere them together in a zig zag way so the circles are opposite sides.
This is the card closed after punching out circles with the 2-1/2" circle punch and keeping it closed with a button.
This is the card opened up.
What do you think?

Thanks for checking in!
Sharon
EMAIL: lim5harona@gmail.com
 

Sunday, October 13, 2013

Soccer card

Hello,
A co-worker asked me to make a soccer card for her son's birthday and here are 2 versions I came up with.

  1. I cut out the Whisper White into a circle 
  2. I used the Honeycomb Embossing Folder and ran the Whisper White and another Basic Black through the Big Shot.  
  3. Hand cut out the hexagons from the Basic Black and adhered them onto the ball.  
  4. Stamped the Happy Birthday from the Banner Greetings set
  5. Used my Fringe scissors to create the grass.


Another tip I saw from another stamper is to use the foam from the Clear Block Store Caddy was to use it to hold the Paper Piercer.  So convenient during classes!!!

Thanks for checking in!
Sharon
EMAIL: lim5harona@gmail.com